> For the complete documentation index, see [llms.txt](https://help.digits.com/llms.txt). Markdown versions of documentation pages are available by appending `.md` to page URLs; this page is available as [Markdown](https://help.digits.com/business-bills-and-invoices/bills.md).
# Managing Bills
Learn how to manage bills in Digits—upload and review invoices, send or approve bills, mark outside payments, fix duplicates, and keep your payables organized and up to date.
***
### First-Time Setup Note
{% hint style="danger" %}
**Note:** Before you can **pay bills through Digits**, [your business has to be verified](/business-bills-and-invoices/business-verification.md).
* You can complete verification yourself.
* If you work with an accountant, they may complete it on your behalf (with your authorization).
You can still **upload and prepare bills while verification is pending**.\
Once you’re approved, any bills that are ready will process automatically—no need to re-enter anything.
{% endhint %}
***
{% stepper %}
{% step %}
### Add a Bill in Digits
Select **Bills** in the left navigation menu.
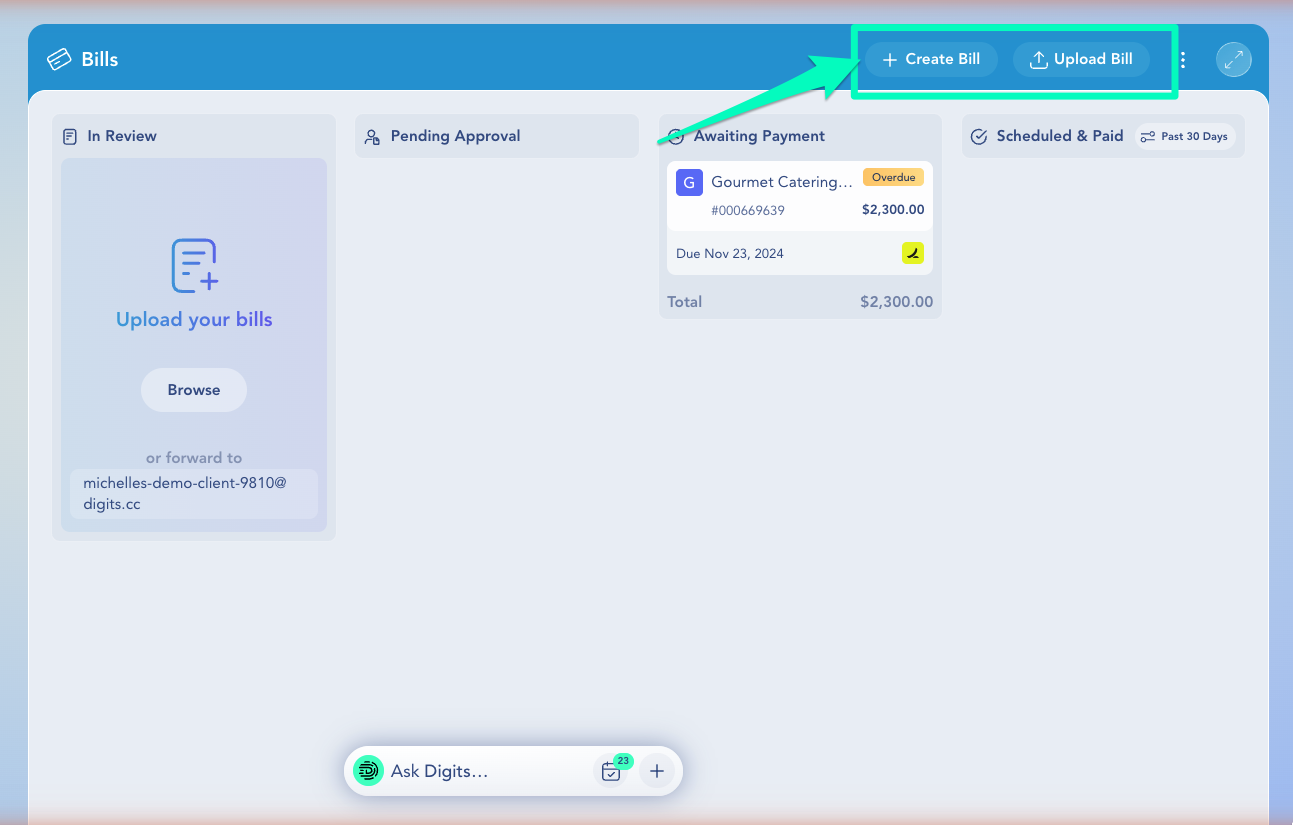
The Bills dashboard displays bills in a Kanban-style layout:
* **In Review** – Drafts that need additional information, approval, or scheduling.
* **Pending Approval** – Sent to your client for approval.
* **Awaiting Payment** – Approved by your client and ready for payment.
* **Scheduled & Paid** – Payment has been scheduled or completed.
To create a bill, choose one of the following:
* Click **Upload Bill** or drag an invoice file into Digits to create a bill with the vendor, amount, dates, and line items pre-filled.
* Click **Create Bill** to start a blank bill and enter the vendor, amount, bill and due dates, and line items manually.
{% hint style="info" %}
**Tip**: :sparkles:When you upload a bill file, Digits scans it and pre-fills as much as it can. The bill will first appear in **In Review**.
{% endhint %}
{% endstep %}
{% step %}
### Review and Complete Details
1. Click the bill to confirm or update the details (d*ate, amount, vendor, memo*).
2. If it’s a **new vendor**, complete the profile by following the prompts to:
* **Review** detected vendor info
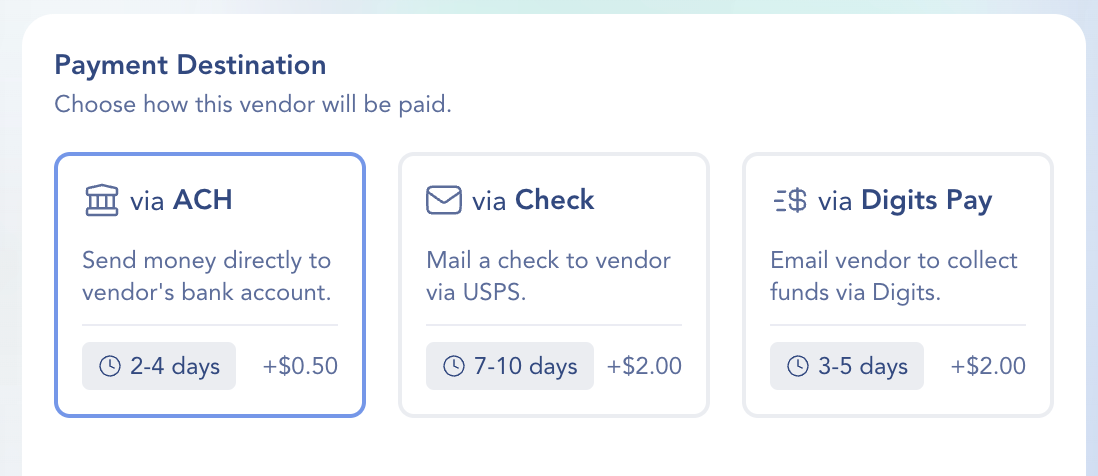
* **Choose** a preferred payment method (*ACH, Check, Digits Pay*)
{% endstep %}
{% step %}
### Approve or Send for Approval
1. (Optional) Add a **memo** if you want extra context for yourself or your team.
2. Choose an **approver** if someone else on your team needs to sign off, or skip this if **you’re the one approving**.
3. Do one of the following:
* Click **Approve** to approve the bill yourself, **or**
* Click **Send for Approval** to route it to someone else’s Checklist
Once the bill is approved, you’ll see the option to **Submit Payment**.
4. Click **Submit Payment** to complete the payment through Digits.
{% endstep %}
{% step %}
### Approver Reviews & Releases Payment
1. If you **send a bill for approval**, here’s what happens next:
* The **approver** (you or someone on your team) gets the bill in their **Checklist** with all the details you prepared.
* They can **review**, make edits if needed, and then **approve** the bill.
* Once approved, Digits moves the bill to **Awaiting Payment**, and after payment is submitted, to **Scheduled** or **Paid**.
{% endstep %}
{% endstepper %}
***
### Frequently Asked Questions
How do I get notified about a bill if I am the approver?
Once someone clicks Send for Approval, the bill appears in your Checklist, and you’ll get a notification to review and approve it.
What if I paid the bill outside Digits?
You can update the status by opening the bill, clicking the menu in the top right, and selecting Mark as Paid.
What if a bill is flagged as a duplicate?
Digits compares the vendor name + invoice number. Review the draft and remove duplicates if needed.
Payments Pricing FAQ
See: [Digits Pay Pricing](/business-bills-and-invoices/digits-pay-pricing.md)
Can I delete or cancel a bill payment?
Once a bill payment has been submitted, it can't be deleted or cancelled in Digits because the funds are already in flight. If you need to stop a payment, contact Digits Support at and we'll help resolve it.
How long does it take for a bill payment to be delivered?
Processing times depend on the payment method you choose:
* **ACH** — 2–4 business days
* **Check** (printed & mailed via USPS) — 7–10 business days
* **Digits Pay** (email vendor to collect funds via Digits) — 3–5[ business days](#user-content-fn-1)[^1]
Does a bill get booked to one category or split by line item?
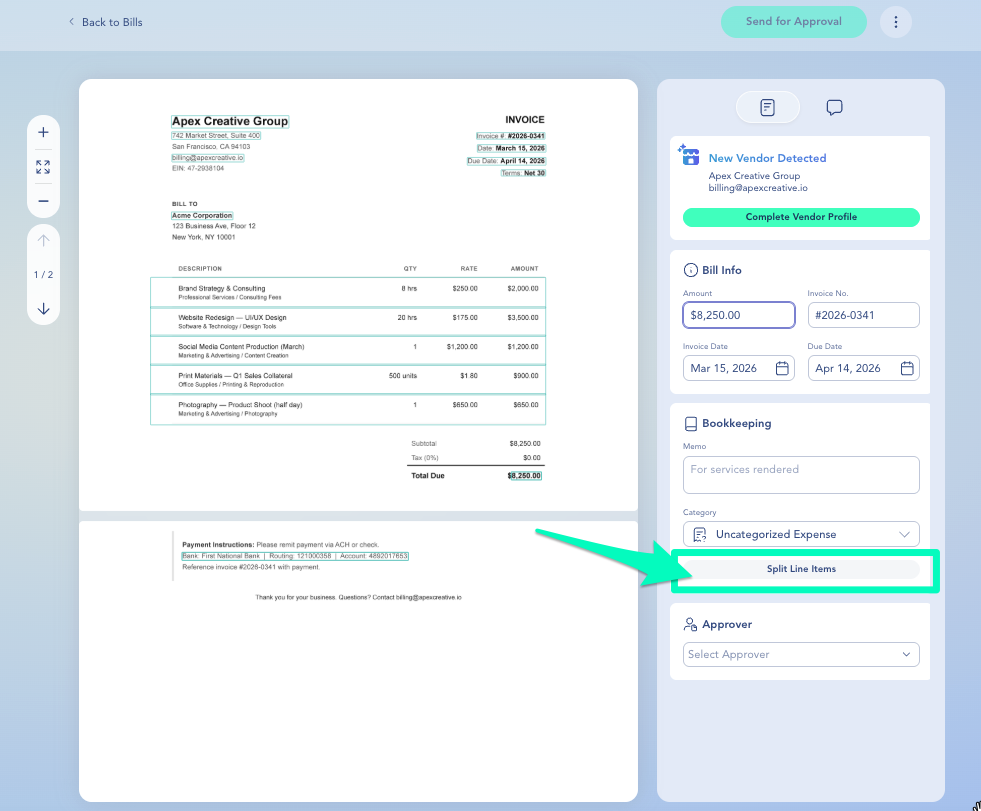
Bills in Digits support multiple line items, and each line item can be assigned its own category. If a line item doesn't have a category assigned, it falls back to the bill-level category. This means your bookkeeping stays accurate at the line-item level, even if the bill covers multiple expense types.
To split a bill across categories, click **Split Line Items** when viewing the bill and assign a category to each line.
How do I reassign a bill to a different vendor?
If the bill was linked to the wrong vendor or created a duplicate:
1. Open the bill.
2. In the **Pay To** section, click **Edit** (pencil icon).
3. Search for and select the correct vendor.
4. Click **Save**.
The bill and its associated transaction will be reassigned to the selected vendor.
{% hint style="info" %}
**Note:** You can reassign the vendor any time before the bill is approved (New, Scheduled, Pending Approval, or Rejected). Once approved or paid, the vendor is locked.
{% endhint %}
Can I upload multiple bills at once?
Yes. You can upload up to 10 bills at a time by selecting multiple files or dragging and dropping them into the Bills dashboard.
Why was my ACH payment blocked?
Some banks use **ACH debit blocks** to prevent unauthorized withdrawals. If your bank has one enabled, it may reject ACH payments from Digits even if you've authorized the payment.
To allow ACH payments, contact your bank and ask them to **whitelist** the following **ACH Company IDs (Originator IDs)**:
| Originator ID |
|---|
| 2638633811 |
| 9263863381 |
| 8263863381 |
| 4263863381 |
| 3263863381 |
| 2263863380 |
{% hint style="info" icon="lightbulb" %}
**Tip:** Ask your bank to whitelist **all six IDs** to prevent future ACH payments from being blocked.
{% endhint %}
After your bank confirms the IDs are authorized, retry the payment. If it's still blocked, contact [help@digits.com](mailto:@help@digits.com).
***
{% columns %}
{% column width="66.66666666666666%" valign="middle" %}
Got a question or feedback? Our team is all ears—come say hello!
{% endcolumn %}
{% column width="33.33333333333334%" valign="middle" %}
Contact Digits Support
{% endcolumn %}
{% endcolumns %}
***
[^1]:
---
# Agent Instructions
This documentation is published with GitBook. GitBook is the documentation platform designed so that both humans and AI agents can read, navigate, and reason over technical content effectively. Learn more at gitbook.com.
## Querying This Documentation
If you need additional information that is not directly available in this page, you can query the documentation dynamically by asking a question.
Perform an HTTP GET request on the current page URL with the `ask` query parameter, and the optional `goal` query parameter:
```
GET https://help.digits.com/business-bills-and-invoices/bills.md?ask=&goal=
```
`ask` is the immediate question: it should be specific, self-contained, and written in natural language.
`goal` is optional and describes the broader end goal you are ultimately trying to accomplish on behalf of the user. GitBook uses it to tailor the answer towards what is most useful for that goal.
The response will contain a direct answer to the question and relevant excerpts and sources from the documentation.
Use this mechanism when the answer is not explicitly present in the current page, you need clarification or additional context, or you want to retrieve related documentation sections.